A lush, evenly-mown lawn bordered by a paved walkway, driveway, and street.

Photo: Miri Talabac, University of Maryland Extension

Updated: March 16, 2026

Key points about keeping lawns healthy

  • Turfgrass that is growing well will be better able to withstand or recover from the demands of foot traffic, weather stress, and pest or disease outbreaks.
  • Support vigorous lawn growth by managing soil conditions for the roots (moisture, drainage, nutrients, and acidity) and mowing properly. Fescue lawns also benefit from annual overseeding to maintain a dense turf.
  • Sustainable lawn maintenance provides the ideal conditions for growth, rather than trying to compensate for poor conditions by using more fertilizer, pesticides, or irrigation. Consider using lawn alternatives when the conditions for vigorous turf cannot be provided.

Benefits and limits of lawn care

Healthy, vigorous turfgrass contributes more to the environment than weakened, struggling turf. Like other groundcovers, lush lawns help to filter pollutants from stormwater, reduce erosion, capture carbon, and lessen urban heat island impacts.

Manage your expectations for what represents a healthy lawn. It won’t necessarily look pristine or be weed-free, and it would not be practical to aim for perfection. Home lawns are not managed in the same way as sports fields and golf courses that are maintained to different standards (and which use more resources to keep them functional and attractive).

Components of lawn care

Measure the square footage of your lawn so you know how much area seed or sod, fertilizer, and lime will cover. Use the Lawn Maintenance Calendar to find the best time of year to aerate, lime, fertilize, and overseed based on lawn type (tall fescue, zoysia, etc.).

Learn about each aspect of lawn care in the following sections:

Mowing lawns

Electric lawn mower cutting turfgrass.
Photo by Adobe Stock

Proper mowing greatly improves the appearance of a lawn, promotes a healthy root system, reduces weed invasion, and lessens disease pressure because it minimizes grass stress. A mulching mower chops the clippings into fine pieces and returns them to the lawn. This is preferable to bagging and removing clippings because it returns organic matter and nutrients to the soil. Clippings are largely composed of water and decompose rapidly. They do not contribute to thatch buildup or increase turf diseases.

Sharpen mower blades at the beginning of each mowing season or replace the blades once a year. (A good rule of thumb is to sharpen mower blades after about 10 cumulative hours of use.) A clean cut causes the least damage to the leaf. Grass will gradually wear-down mower blades, and dull blades give cut grass a frayed and brown-tipped look. Clean debris out of the mower base to reduce wear-and-tear on the blades and to minimize the spread of diseases. Brush or scrape away the material, or use a pressure washer. (Avoid water when possible, which may contribute to rust. Garden hose water pressure is not strong enough to clean thoroughly.)

Mown grass blades with frayed brown tips held on top of a removed mower blade that is rusted, pitted, and dull.
Worn mower blades cause torn, brown, dried-out grass tips.
Photo: Miri Talabac, University of Maryland Extension
Electric lawn mower propped up on its rear wheels to expose the mower blade housing underneath. A wad of grass clippings sits in the undercarriage.
Debris can collect in the mower base if not periodically brushed or scraped out.
Photo: Miri Talabac, University of Maryland Extension

When to mow

Mow during the growing season: spring and autumn for cool-season turf, and summer for warm-season turf. How quickly the grass grows will vary with the type of grass and the environmental conditions (sun exposure, soil moisture and fertility, temperature). Mow as often as needed to keep up. For example, once-weekly mowing might not be enough during the peak of spring growth for tall fescue, but zoysia is slower and might only need mowing every 1½ to 2 weeks unless summer weather is hot and rainy. Do not mow when a lawn is wet or has paused growth due to dormancy from drought stress or hot weather (over 90℉).

Remove no more than one-third of the grass blade each time you mow. For example, to maintain a 3-inch lawn height, mow when the grass reaches a height of 4 inches. Don’t let the grass get too tall between mowings since removing larger amounts of leaf surface can result in plant shock, dried-out leaf tips, and reduced grass health. Mowing to the proper height can reduce weeds and diseases by 50% to 80% in tall fescue lawns because the plant doesn’t need to spend as much energy on regrowth.

Recommended mowing height

Mowing cool-season grass too short is a major contributor to lawn deterioration and weed abundance (especially for crabgrass). Low mowing stresses grass roots, causing the plants to become weaker and less drought-tolerant.

Mowing warm-season grass too high contributes to faster thatch buildup. However, the final mowing of the season before dormancy can be about a half-inch higher than usual, which may give the grass slightly more winter cold protection.

Turf typeMowing height
Tall fescue3 to 4 inches
Kentucky bluegrass2½ to 3½ inches
Fine fescue3 to 4 inches
Zoysia1½ to 2½ inches
Bermudagrass1 to 1½ inches

During the hottest, driest part of summer, avoid mowing fine fescue lawns to prevent damage, and use the highest mower setting for tall fescue lawns. (Fescue growth often pauses during such weather, so mowing might not be needed much.) Overall, fine fescue grows best when not mown regularly; use it like an unmown groundcover.

Watering established lawns

Oscillating style lawn sprinkler attached to a garden hose, watering a lawn.
Oscillating style of lawn sprinkler. Photo by Adobe Stock

Monitor soil moisture and water only as needed, not on a set schedule. Enough water needs to percolate deeply into the soil to rehydrate roots. Grass in active growth (not dormant) does best with about 1 inch of water per week, either from rain or irrigation. Generally, 1 inch of water will soak about 6 inches deep into the soil. A passing heavy downpour might not moisten the soil as well as a longer, steady rain.

Determine when to water

A hollow metal tube used to take soil core samples. One side has a cutout area to view the sample.
A soil core sampler tool can help monitor moisture at depth.
Photo: Joe Boggs, Ohio State University
Footprints in a drought-stressed lawn, detectable by the duller-colored, flattened grass blades where someone stepped.
Footprints and a duller blue-gray color on drought-stressed lawn.
Photo: Miri Talabac, University of Maryland Extension

Feel or probe the soil to judge moisture level; a soil core sampler, trowel, or screwdriver can be useful tools. When the grass is in active growth, watering may be needed when the soil gets fairly dry to the touch at least 4 inches deep.

Symptoms of lawn drought stress include:

  • a color change to a duller blue-gray or blue-green
  • thinner-than-normal grass blades (the sides roll inward, making the blade look skinnier)
  • showing footprints (the grass takes more than a few minutes to bounce back after being stepped-on)

Let summer-stressed lawns go dormant

Dormant turfgrass may turn brown while growth is paused. Lawn dormancy is a natural survival response to seasonal changes or stressful growing conditions. Cool-season grasses go dormant in hot, dry weather during summer; warm-season grasses are dormant in winter.

Let established cool-season lawns go dormant during summer – do not attempt to keep them lush and growing with frequent irrigation. Dormant lawns continue to benefit the environment by reducing erosion and filtering potential pollutants. The lawn will typically recover on its own when conditions become more favorable for growth.

During prolonged drought, when dry conditions last at least 4 weeks, irrigate just often enough to keep the crowns and roots alive. The crown of a grass plant is the area at soil level where the roots and shoots (above-ground growth) meet. New growth originates from the crown when turfgrass has to regrow foliage. Walking or driving on drought-stressed turf before it recovers may cause significant damage to the grass.

How to water established lawns

Established lawns are watered differently than new lawns. The frequent, shallow watering used to germinate new grass would either not moisten established grass enough to support growth, or it would cause problems that diminish the lawn’s health or appearance.

Water deeply but infrequently. It is a common mistake to lightly water established lawns every day or several times a week. Automatic irrigation systems are often programmed incorrectly, running too often and for too short a duration. Adjust the programming throughout the growing season to meet the needs of grass. If an irrigation system doesn’t have a rain sensor, turn it off during periods of wet weather.

Watering too lightly:

  • will not soak in deeply enough to moisten the soil to a 4- to 6-inch depth
  • forces grass roots to stay shallow, which limits their drought tolerance and access to nutrients
  • wastes more water to evaporation compared to deep watering

Watering too often:

  • favors the growth of moss, algae, and moisture-loving weeds like green kyllinga and yellow nutsedge
  • aids the survival of pest insects like white grubs
  • makes soils more prone to compaction from foot traffic
  • encourages weed seeds to germinate
  • gives fungi more opportunity to infect the grass

Water in the morning to minimize how long the grass stays wet, since prolonged leaf wetness can lead to disease outbreaks. Water will also be lost to higher evaporation rates in the afternoon. Use a sprinkler to apply 1 inch of water to the lawn, which can be measured with either a rain gauge or a shallow empty container (like a tuna can). After an inch of water collects in the container, check the soil: it should be moist 4 to 6 inches down.

A glass tube rain gauge with one-inch increment markings, held upright in a plastic support frame inserted into a lawn.
A rain gauge measures irrigation water.
Photo: Miri Talabac, University of Maryland Extension

Water slowly, especially on slopes, to prevent runoff that erodes soil, carries pollutants, and wastes water by flowing off-site before it can soak in. Compacted soil and heavy clay subsoils absorb water slowly and might not keep up with the rate of irrigation. This may make it hard to adequately rehydrate the soil in one watering. If needed, water until there is a risk of runoff, move the sprinkler (or change irrigation system zones) to water another area, and then return to that zone to continue watering; repeat the process as needed.

How long to water depends on factors unique to the site: soil texture (loam, sand, clay, etc.), the degree of soil compaction, thatch layer thickness, the volume of water supplied by the hose and sprinkler, and how dry the soil has become before watering. As a very general guideline, a lawn sprinkler may need to be run for 30 to 90 minutes per area of coverage. Select a sprinkler that produces large water droplets, since smaller droplets from mist-type sprays will evaporate more readily, wasting water.

Watering Lawn During Drought

Summer Lawn Care: How to Water

What Is the Best Time of Day to Water?

Applying lime

Wheeled walk-behind lawn spreader consisting of a basin that empties onto a rotating disc that flings the material onto the lawn.
Lime is easiest to apply with a spreader. Photo by Adobe Stock

Soil acidity (pH) influences how easily roots can access nutrients. Use laboratory soil testing to determine if adjustments to pH are needed; do not apply lime to raise soil pH without verifying that the pH is lower than the range tolerated by turfgrass. In addition to natural factors, the use of fertilizers and herbicides on a lawn can affect soil pH over time. (Water-soluble nitrogen sources in fertilizer acidify soil faster than water-insoluble forms of nitrogen.)

Types of lime

Lime is sold in several forms that differ in composition and grain size. How finely-ground the lime is affects how quickly it interacts with the soil to alter pH. Fine-grain (small mesh size) forms of lime are generally faster acting but harder to apply evenly and safely compared to pelletized forms. Clay soils generally have more resistance to pH changes than sandy soils.

Agricultural lime (calcitic lime) is derived from calcium carbonate. Dolomitic lime also contains magnesium, and is more suitable for lawns with a magnesium deficiency. Avoid powdered lime, which is too finely ground. Do not use hydrated lime (calcium hydroxide) or burned/quick lime (calcium oxide) because they are caustic and pose a personal safety hazard during application.

When and how to use lime

  • Most lawns will not need a lime application every year, and one lime application may take up to 6 months to measurably change pH. Check soil pH with a laboratory test every 3 to 4 years.
  • No lime is needed for mildly acidic soil in the 6.0 to 6.8 pH range, which is optimum for turf growth. In particular, tall fescue grows well in the 5.8 to 6.5 pH range. Zoysia grows well in the 6.0 to 7.0 pH range.
  • If the soil pH measures below 5.5, apply lime to raise the pH (make the soil more alkaline).
  • If the soil pH measures above 7.0, apply sulfur to lower the pH (make the soil more acidic). Maryland soils have a tendency to become acidic over time, and a pH above 7.0 is uncommon unless the soil is very high in organic matter. For tall fescue, acidify the soil if the pH rises above 7.0; zoysia and bermudagrass tolerate an upper limit pH of 7.7.
  • The soil testing lab should provide a lime application rate (usually in pounds per 1,000 square feet) if a pH increase is recommended. If more than 50 pounds of lime per 1,000 square feet are needed, the amount should be split into two applications. For example, if 85 pounds is needed, apply 50 pounds and wait 6 months to apply the remaining 35 pounds.
  • Apply with a spreader for even coverage. Divide the volume of lime needed for the entire lawn into two equal parts. Apply one half in one direction (for example, north-south) and the other half in the opposite direction (east-west). Adjust the spreader settings to apply the lime at half the recommended rate when using that method.
  • Use caution around tree and shrub roots that infiltrate the lawn or receive runoff from lawn areas. Many widely-grown tree and shrub species grow best in acidic soil and should not be limed.
  • Apply lime any time of year, though the ideal season is autumn. The freezing and thawing of the soil over the winter will help to incorporate the lime into the ground. Do not apply lime on top of snow- or frost-covered turf.

Aerating soil

Avoid compaction

Roots need access to air in the soil to stay healthy. Compaction squeezes soil particles closer together (clay compresses more readily than sand), which leaves less room for air to reach roots. A compacted soil layer as thin as ¼- to ½-inch, usually at the soil surface, can have significant impacts. Compacted soil drains water more slowly, and can also be harder to re-moisten when dry.

The weight of cars, construction equipment, and repeated human and pet foot traffic compacts the soil, from which it cannot easily recover. Wet soil is particularly vulnerable to compaction; avoid walking on a lawn after heavy rain or snow.

Improve drainage

Mechanical aeration helps alleviate compaction by creating channels for air and water to move more easily through soil layers. Added benefits include exposing soil for better grass seed germination and helping to incorporate a lime or fertilizer application into the root zone.

Close-up of the row of hollow tines on the underside of a lawn core aerator machine.
Hollow tines on a core aerator machine.
Photo by Adobe Stock
Two-tined manual core aerator. A person's foot is stepping on the platform that pushes the tines on either side into the soil.
Manual step-on core aerator tool.
Photo by Adobe Stock
Soil plugs removed by a core aerator, deposited on top of the lawn.
Soil plugs removed by a core aerator. Photo: HGIC

Core aerators remove plugs (cores) of soil and drop them on the surface. The plugs are about 2 to 4 inches deep and ½- to ¾-inch wide, and spaced about 2 to 6 inches apart. They disintegrate in a couple of weeks. Machine aerators are rolled over the lawn like a mower, and handheld versions are stepped-on like a shovel. Avoid solid-tined aerators that press holes into the soil without removing plugs, because they can contribute to compaction.

When to aerate

Aerate when the lawn is in active growth, not during dormancy. Irrigate first if the weather has been dry so the corer cuts into the soil more easily. Aeration frequency depends on how quickly the soil becomes compacted and how heavily the lawn is used. Ideally, aerate once per year in autumn, just prior to seeding, particularly for areas with regular foot traffic. Otherwise, aerating once every 2 to 3 years should suffice.

Aeration alone can’t solve soil saturation problems. Areas too wet or poorly drained for turfgrass should be replanted with species that thrive in or tolerate those conditions.

Overseeding to keep growth lush

Cool-season lawns benefit from annual overseeding in the autumn. This practice fills in bare or sparse areas, increasing overall grass density to crowd out weeds and repair minor damage. Overseeding is also an opportunity to add young, vigorous grass to the lawn that will better resist diseases and heat stress (when recommended cultivars are used).

A person pushing a broadcast spreader depositing grass seed over an established lawn.
Overseeding with a broadcast spreader. Photo: Miri Talabac, University of Maryland Extension

Overseeding steps

This process applies to cool-season lawns, with a focus on tall fescue; warm-season turfgrasses are not overseeded.

  1. Test soil: Use a laboratory soil test to determine if the soil acidity (pH), nutrient levels, and organic matter content are within the ideal range for best grass growth. If the pH needs to be raised, the lab’s report will state how much lime is needed.
  2. Weed: Remove weeds, prioritizing hard-to-kill and aggressive species that will out-compete turfgrass seedlings. (Examples include spreading perennials like bermudagrass, ground ivy, mock strawberry, and quackgrass.) If herbicide is necessary to eradicate tough weeds, check the product label for any required waiting period before turfgrass seeds can be sown.
  3. Shop: Purchase the grass seed, guided by the list of recommended turfgrass cultivars.
  4. Mow: Cut the lawn on a low mower setting (a height of around 2 to 2½ inches). This improves seed-to-soil contact and lets more sunlight reach the soil surface, both of which are important for better germination.
  5. Rake/roughen: Remove any bulky lawn clippings and loosen the soil surface with a steel rake. For large areas, it may be more practical to rent a machine to prepare the soil. A core aerator, vertical mower, or slit seeder will improve seed-to-soil contact by breaking through any thatch layer (typically only present in Kentucky bluegrass lawns) and by roughing-up the soil surface. More than one pass of the machine might be needed to make enough core plugs or furrows.
  6. Apply amendments: Use a spreader to apply fertilizer and any needed lime. If possible, make the lime application about 1 month prior to the fertilizer application. This gives the resulting initial pH spike at the soil surface time to settle to a level where the added nutrients will be available to seedling turf roots. An alternative is to only apply fertilizer in this step and wait to apply lime until the end of the growing season. Winter freeze-thaw cycles will help move the lime from the surface further into the soil.
  7. Sow seed: Use a walk-behind or hand-cranked spreader. For more even distribution, divide the total amount of seed for the entire lawn area into two equal parts. With a spreader, apply half of the seed in one direction (for example, north-south) and the other half in the opposite direction (east-west). Be sure to adjust the spreader settings to reduce the application rate by half with that approach.
  8. Press seed onto soil: Tamp the seed down with the back of a metal rake. For larger areas, use a water-filled roller to lightly press the seeds into the soil surface.
  9. Water and weed as needed, following the after-care recommendations in Starting a New Lawn.

Overseeding rates

Seeding rate per 1,000 square feet of soil surface
Turf TypeSeed Application Rate
Tall fescue4 pounds
Kentucky bluegrass1 to 1½ pounds
Fine fescue2½ to 3 pounds

Fertilizing established lawns

Well-nourished turfgrass supports healthy, vigorous growth that is resistant to stress and better able to rebound from damage. Lawns face many stresses, including regular mowing, wear-and-tear, drought, weed competition, and pest or disease outbreaks.

Fertilize responsibly

Do not guess what nutrients the lawn needs: measure them with a laboratory soil test. Testing once about every 3 years is sufficient. Over-applying and under-applying fertilizer can contribute to problems.

Fertilizer application rate and timing

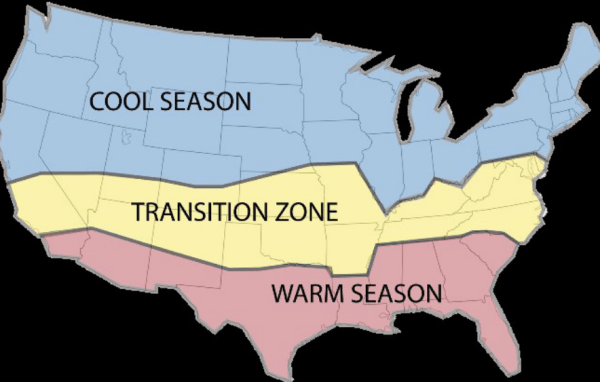
How much fertilizer to apply, and what time of year to apply it, depends on lawn type:

  • Cool-season lawns (fescues and bluegrass) are best fertilized late summer into autumn.
  • Warm-season lawns (zoysia and bermudagrass) are fertilized late spring into summer.

In the following chart, application amounts are listed in pounds of nitrogen (N) per 1,000 square feet of lawn. Fertilizer bags typically cover 5,000, 10,000, or 15,000 square feet. Do not over-fertilize: excessive nitrogen can make lawns more vulnerable to diseases and less resistant to stress.

Nitrogen application timing and rate (in pounds per 1,000 square feet of lawn) for each turf type.
Turf type (dominant grass)SeptemberOctober through Nov. 15May to early JuneJune to JulyAugustMaximum yearly N
Tall fescue0.7 to 0.90.7 to 0.90.5 to 0.9 (optional)nonenone2.7
Kentucky bluegrass0.7 to 0.90.7 to 0.90.5 to 0.9 (optional)nonenone2.7
Fine fescue0.7 to 0.9none0.5 (optional)nonenone1.4
Zoysianonenone0.7 to 0.90.5 to 0.9 (optional)none1.8
Bermudagrassnonenone0.7 to 0.90.7 to 0.90.5 to 0.9 (optional)2.7

Skip fertilizer applications listed as optional, except in any of these situations:

  • Newly-established lawns, or lawns that need help recovering from heavy use, a pest or disease outbreak, or other causes of damage
  • Lawns with poor vigor, density, or color (lighter green) – note that some grassy weeds naturally have a lighter color (like roughstalk bluegrass) or darker color (annual bluegrass) that are not reliable indicators of turfgrass health
  • Grass clippings are removed and not mulched into the lawn
  • History of a severe crabgrass infestation
  • Skipped fall fertilization

Types of nitrogen

Nitrogen can be provided in water-soluble (quick-release) and water-insoluble (slow-release or controlled-release) forms. Water-soluble N is less expensive and can green-up a lawn quickly, but it only has short-term impacts and risks “burning” the grass from overexposure. Water-insoluble nitrogen (WIN) is more expensive but provides a more even release of N as soil microbes and other factors gradually convert WIN into soluble forms.

In the fertilizer chart, the low end of the N range applies to using water-soluble N sources, such as urea and ammonium sulfate. The high end of the range applies to using a product combining water-soluble and water-insoluble N.

In addition to promoting more uniform growth, slow-release N reduces the risk of leaching (polluting water runoff). Due to the faster loss of water-soluble nitrogen, lawns growing in a sandy soil or near a high water table should favor slow-release N.

Lawn fertilizers used in Maryland must contain a minimum of 20% slow-release N. Applied according to the label directions, they should provide no more than 0.9 pounds per 1,000 square feet of total N per application. “Maintenance” fertilizer formulations for routine use will also be P-free except for “starter” formulations that are intended for use on new lawns. When fertilizers can be used that do contain P, look for a general N-P-K ratio of about 3:1:2.

Fertilizer calculations

Calculate how much fertilizer is needed before purchasing so you don’t have to store unused fertilizer for very long; keep the fertilizer cool and dry. To calculate the correct amount of fertilizer to use on a lawn, three numbers are important:

  • the desired pounds of N (per 1,000 square feet) from the fertilizer chart
  • the percentage of N in the fertilizer analysis (the N-P-K on its label)
  • the size of the lawn in square feet.

If a lawn is over an acre, convert the area from acres into square feet. (There are 43,560 square feet in an acre.)

To determine how much fertilizer to buy, use the formula:

(desired pounds of N ÷ % N in analysis) × (lawn square footage ÷ 1,000) = pounds of fertilizer to apply

Example: an 8,000 square foot lawn will be fertilized at a rate of 0.9 pounds of N per 1,000 square feet using a fertilizer with the N-P-K analysis of 26-3-3

(0.9 ÷ 0.26) × (8000 ÷ 1000) = 27.7 pounds of fertilizer is needed for the whole lawn

The fertilizer analysis label will list the types of N in the formulation. To calculate how much of a fertilizer’s N is in slow-release form, find the percentage of water-insoluble nitrogen (WIN) on the label and divide by the total percentage of nitrogen in the package, then multiply by 100.

(% of WIN ÷ % of total N) × 100 = % WIN in the bag

Example: a fertilizer analysis of 18-0-3 lists on the label that 7% of the fertilizer is WIN. 7 ÷ 18 = 0.39 × 100 = 39% of the bag’s N is in insoluble form

Account for compost nutrients

Compost contains low levels of slow-release nutrients, including nitrogen. If it is applied to an established lawn as a top-dressing to amend soil or sow seed, its nutrient content must be included in the annual application limits. About 5 to 10% of the N and 30 to 50% of the P in compost is available to plants in the year it is applied. Top-dressing with organic matter will not provide all of the turf’s N and P needs, so the lawn will likely still need fertilization.

Commercial bagged or bulk compost sources should have nutrient analysis data available (less than 2 years old). Homemade or farm-sourced compost would need to be tested to measure nutrient content. A standard soil test is not the same as a compost test; a compost analysis test may cost about $50.

Use compost nutrient analysis results to determine how much to apply to a lawn per 1,000 square feet (use the same equation for either N or P):

desired P application rate divided by percentage P content from analysis = pounds of compost to apply

Lawns with more than one turf type

The fertilization of lawns with a combination of cool- and warm-season grasses is less straightforward, which is why restricting a lawn to one grass type is ideal. If the grasses grow in distinct areas (for example, zoysia in the front yard and fescue in the back yard), care for each area according to that turf type.

If the grasses intermingle throughout the lawn, a compromise will need to be made. For a mix of tall fescue and zoysia, make two fertilizer applications per year: one during the first fertilization window of time recommended for zoysia (late spring), and the second during the main fertilization window recommended for tall fescue (early autumn).

When a tall fescue lawn contains a high percentage of fine fescue, the total annual nitrogen application could be reduced to between 2.0 and 2.7 pounds of nitrogen per 1,000 square feet.

Nutrient sources

Nutrients can come from natural sources (organic matter in the soil) and from fertilizer. To rely less on synthetic fertilizers, allow finely-chopped (“mulched”) grass clippings and leaf litter to self-compost on the lawn instead of removing them. Recycling nutrients from these sources for at least two years can provide about 25% of your lawn's annual nutrient needs. This reduces fertilizer use by potentially eliminating one application each year.

Nitrogen is the nutrient lawns generally need supplemented the most. New lawns less than 2 years old should receive the maximum amount of nitrogen fertilizer to help with establishment. In subsequent years, the optional fertilizer application can be skipped. Healthy lawns established for about 10 years or more may only need one nitrogen application per year.

Corn gluten is an organic source of nitrogen that can be used to fertilize established lawns. It is also sold as an herbicide to prevent weed seed germination. However, when corn gluten is used to suppress weeds, the amount of nitrogen per application exceeds the amount allowed by the fertilizer law. Directions for use on the bag’s label should list separate rates of application for weed control and for fertilizing.

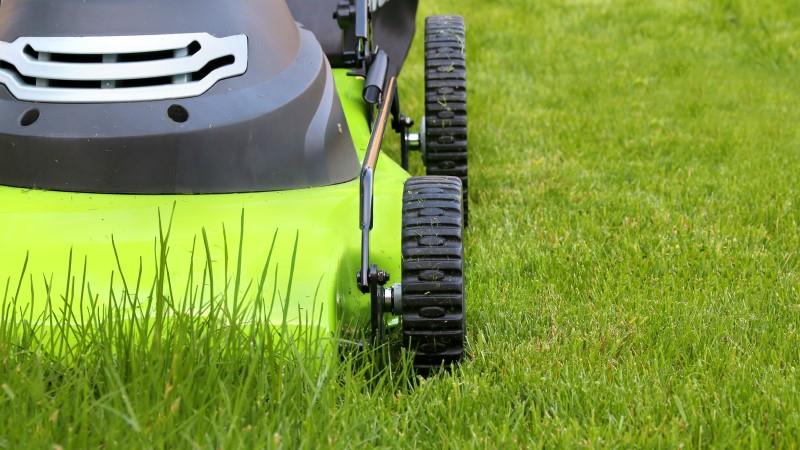
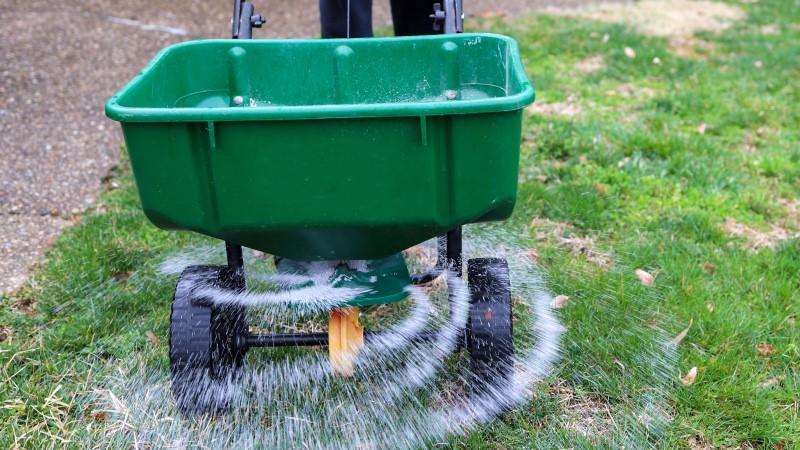
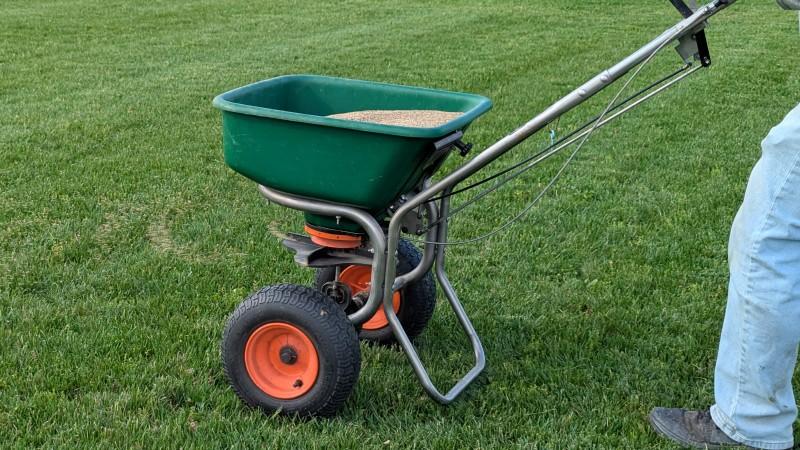
Fertilizer application tools

Lawn spreaders consist of a basin with an adjustable gate in the bottom where the fertilizer falls through. Spreaders can be wheeled walk-behind models or handheld. Calibration settings for how fast fertilizer is released vary from one brand of spreader to another; refer to the user manual.

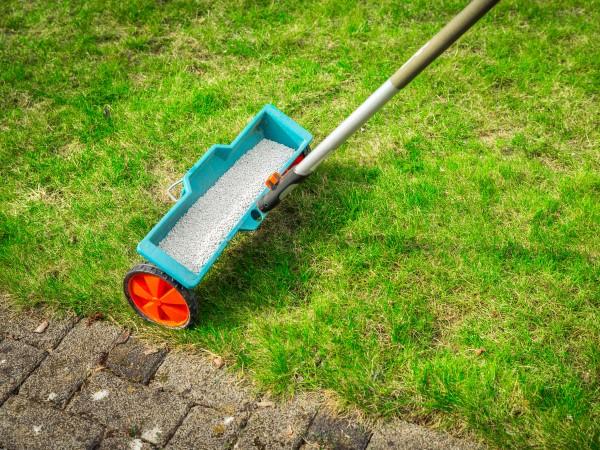
  • Drop spreaders let the fertilizer fall straight down onto the ground between the wheels. This style is the easiest to use for its precision next to pavement, in small spaces, or in curved lawn areas to avoid overlapping applications.
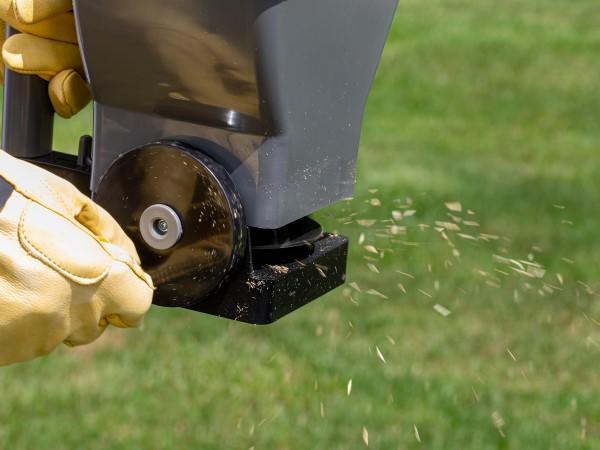
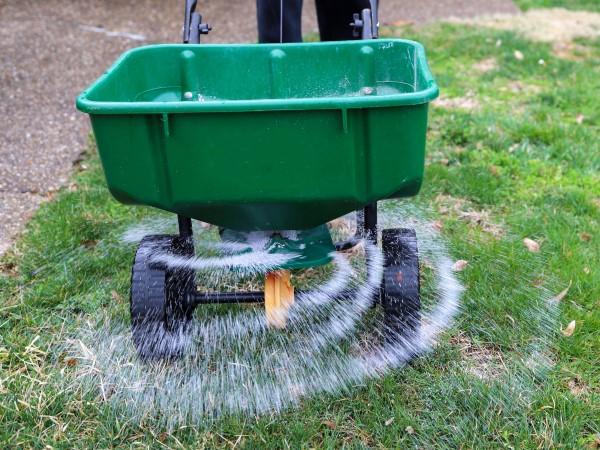
  • Broadcast (rotary) spreaders use a spinning disc below the falling fertilizer to fling it out to a wider area. The rate of spin depends on either how fast you walk or how fast you crank a handle on a handheld model. Some broadcast spreaders have an adjustable or removable shield/deflector on one side of the disc to keep fertilizer from being applied to pavement, garden beds, or other surfaces.
Walk-behind long-handled drop spreader. Fertilizer fills the basin and drops in measured amounts onto the lawn below.
Drop spreaders deposit the material directly below the spreader.
Photo by Adobe Stock
Handheld rotary spreader consisting of a small basin dropping material onto a spinning disc below, which is rotated with a hand crank.
Handheld rotary spreaders fling the material as you rotate the handle.
Photo by Adobe Stock
Wheeled walk-behind lawn spreader consisting of a basin that empties onto a rotating disc that flings the material onto the lawn.
Broadcast spreaders fling the material as you walk.
Photo by Adobe Stock

How to apply fertilizer

Apply evenly

  • Use a lawn spreader to apply fertilizer evenly; do not sprinkle it by hand. Brand-name fertilizers usually list the proper calibration setting (on the same brand of spreader) to apply a specific amount of nitrogen.
  • Divide the total amount of fertilizer needed for the entire lawn area into two equal parts. Make one application at half the application rate in one direction and the other half in a perpendicular direction. For example, instead of one spreader pass over the lawn at a rate of 0.8 pound of nitrogen, make one pass in a north-south direction at a rate of 0.4 pound, and the second pass in an east-west direction at a rate of 0.4 pound.
  • Avoid “striping” (uneven applications) which creates bands of darker green over-fertilized grass and paler under-fertilized grass. Striping is more likely with a drop spreader (which only deposits fertilizer between the spreader wheels) than with a rotary spreader (which flings fertilizer in a wider swath). Line up drop spreader applications from wheel track to wheel track so there is no overlap or skipped gaps.

Avoid pollution

  • Fill the spreader on grassy areas, not hard surfaces, in case of a spill.
  • Sweep or blow fertilizer pellets that land on hard surfaces back into grassy areas so they do not pollute runoff.
  • Do not apply fertilizer within a setback zone around a water source. This minimizes nutrient runoff pollution. Water sources include surface water (ponds, shorelines, streams) and any structure that brings runoff to a waterway (storm drains, gutters). The setback for a drop spreader should be 10 feet; use 15 feet for a broadcast spreader.
  • Do not apply fertilizer just prior to forecasted heavy rain or when the ground is frozen.
  • Do not fertilize a lawn that is dormant due to winter or weather stress.
Still image from a video presentation about how to fertilize a home lawn. A presenter is standing in a large lawn behind commonly-used lawn equipment.
Video: How to Fertilize Your Lawn

Dethatching lawns

Large cylindrical core of turfgrass removed and laying on its side, showing a thick layer of dead stems between the live blades and soil below.
A thatch layer thick enough to need addressing.
Photo: Gregg Munshaw
Dethatching machine, similar-looking to a mower, being pushed across a lawn. Where the machine has passed, prominent tufts of brown dead grass have been left on the lawn surface.
Mower-sized dethatching machine.
Photo by Adobe Stock

Thatch is the intermingled layer of living and dead stems, leaves, and roots that exist between the soil and top growth.

  • Zoysia, bermudagrass, and Kentucky bluegrass tend to produce lots of thatch. Fescues and perennial ryegrass produce thatch slowly enough that it generally doesn’t need removal.
  • A thin thatch layer (¼ to ½ inch) provides benefits like surface cushioning and increased wear tolerance, and it moderates soil temperature like a mulch.
  • Excessive thatch (1 inch or more) can cause a variety of lawn problems:
    • hampers water and air from reaching the root zone, reducing turf tolerance to drought and temperature extremes
    • shelters pest insects (sod webworms, chinch bugs, billbugs) and fungal pathogens
    • prevents some insecticides, fungicides, and herbicides from entering the soil
    • interferes with overseeding, since seed cannot reach the soil surface to germinate and establish

Thatch buildup and removal

  • Over-fertilizing and watering too lightly and frequently can increase the rate of thatch buildup.
  • Beneficial soil microbes and arthropods decompose thatch. Good soil organic matter content (measured at 3% or more in soil test results) supports this soil ecosystem, which can be aided by mulching grass clippings. Avoid pesticides, which can harm earthworms and other soil life.
  • The best time to dethatch is during active grass growth so the lawn recovers quickly. Dethatch in late spring or early summer for zoysia and early autumn for Kentucky bluegrass. Manual and machine dethatchers can temporarily cause significant damage to the lawn (potentially for 2 to 3 weeks).
  • A sturdy steel rake can remove thatch by hand in small areas. Machine options include a vertical mower that slices through the thatch layer, or power rake that combs loosened debris out of the grass. A core aerator can punch through thatch, but will not remove enough to benefit the rest of the lawn.
Long-handled stiff-tined metal rake combing loose brown thatch out of a lawn.
A sturdy rake is needed to comb out the thatch layer.
Photo by Adobe Stock
Dethatching machine with rotating metal combs pulling thatch roughly out of a lawn. Clumps of dark thatch and ripped-up tufts of grass surround the machine.
Dethatching machines can be rough on the lawn.
Photo by Adobe Stock

Reducing maintenance by replacing lawn

Lawn maintenance is time-consuming and bears costs that can include buying seed, fertilizer, and lime; testing the soil; sharpening mower blades; running irrigation; and renting equipment or hiring a lawn care company. While other landscape plants do incur installation and maintenance costs, over the long term, they generally save money and take less effort to maintain in good condition.

Lawns have low ecological value compared to a more native-focused, species-diverse landscape. Where possible, replace turfgrass with other plants.

A person using a shovel to scrape a couple inches of turfgrass sod off the soil. The area behind the person is bare ground where sod has been removed. An empty wheelbarrow sits next to the sod being removed.
Removing turf before planting can help new plants establish.
Photo by Adobe Stock

Planting alternatives

Prioritize lawn replacement in areas that develop recurring problems, especially if routine maintenance is not enough to support good growth. Use native plants when they are available and suited to site conditions. Locally-native species provide ecosystem support; while they are not maintenance- or problem-free, diverse landscapes attract more wildlife and have fewer serious or widespread issues.

  • A meadow-like planting of long grass interspersed with flowering Penstemon in a sunny area next to a walkway.

    Lawn Alternatives

    Lawn Alternatives

    Learn about groundcovers, moss, and meadows; explore sample planting plans.

  • A groundcover planting along a path and under a shade tree consisting of a mix of native perennials.

    Maryland Native Plants Program

    Maryland Native Plants Program

    Explore resources for selecting native species based on growing conditions, wildlife value, and seasonal interest.

  • A large sunny lawn area interspersed with islands of perennial planting beds.

    Converting Lawns Into Diverse Landscapes: Case Studies

    Converting Lawns Into Diverse Landscapes: Case Studies

    Replacing grass areas with locally-adapted native plants is an effective way to make your property beautiful and better for the environment.

Additional resources

Linked page opens in a new browser tab.

How to choose a lawn care service (PDF) | Maryland Department of Agriculture

Author: Miri Talabac, Lead Horticulture Coordinator, HGIC. January 2026.

Copy editing by Nancy Klein, Maryland Master Gardener, December 2025.

Content reviewed by:
David Clement, Ph.D., Extension Specialist in Plant Pathology, December 2025.
Geoff Rinehart, Lecturer and Turfgrass Management Advisor, Institute of Applied Agriculture, September 2025.
Charles Schuster, Senior Agent, Extension Educator, Commercial Horticulture (retired), August 2025.

Still have a question? Contact us at Ask Extension.